工作上经常做一些蓝牙的设备开发,但是一直没有一个比较好的软件工具来配合自己的蓝牙设备,之前在windows上面使用C#做过一个,感觉用PC已经是很古老的方式了,都2021年了,肯定得使用手机才显得高大上。
于是乎开始尝试了IOS开发,Android开发,发现太庞大了,学习成本太高,并且也比较难兼容所有的手机,于是掉头想到了小程序。
说干就干,首先就是小程序的一些开发基础要学习
小程序文件结构的基础
onLaunch() {
    // 展示本地存储能力    const logs = wx.getStorageSync('logs') || []
    logs.unshift(Date.now())
    wx.setStorageSync('logs', logs)
    console.log("story log")
    // 登录    wx.login({
      success: res => {
        // 发送 res.code 到后台换取 openId, sessionKey, unionId
        console.log("logining")
      }
    })
  },
小程序非常类似前端的开发,基本上一个页面有三个文件,类似xml前端布局文件,类似css的样式文件,还有一个最重要的类似js的Javascript文件,大部分逻辑程序都在js文件中执行。
上面的onLaunch()函数就是在js中的一个事件,他会在页面加载的时候执行。
小程序的第一个页面
小程序运行时的第一个界面在APP.json中设置,这个文件中会列出所有页面,但是排在第一排的这个就是小程序默认启动时的页面。
"pages":[
    "pages/index/index",
    "pages/logs/logs"
  ],
如何在page外调用page中的数据
在js 文件中如何在page()之外的地方调用page()内定义的函数?
1.在全局let _this ;
2.在onload函数里面赋值 _this = this;
3.在Page外部加一个延迟调用就可以了,延时应该是为了页面加载。确定加载完也不需要延时了。
如何修改page中的数据
修改page中data的方法是使用this.setData方法,按照KEY:Value进行修改。如下面代码是增加一个数组元素。
//要增加的数组
var newarray = [{
      avatarUrl:'111',
      name:name,
      gender:'nv',
      post:'12',
      fans:15,
      isFollow:true
    }];
      this.data.friends = newarray.concat(this.data.friends);
    this.setData({
        'friends':    this.data.friends
    });
从界面的事件中获取属性,比如view空间的点击事件后,可以获取被点击对象的参数
首先需要在xml文件中进行变量的定义,如下面的data-name,data-id
    <view class="follow {{item.isFollow ? 'follows' : ''}}" data-name="{{item.name}}" data-id="{{item.DevId}}" bindtap="btConnectClick">
    {{item.isFollow ? "已连接" : "连接"}}    </view>
这两个变量将存储对应view的数据信息,并且在绑定的bindtap事件BTConnectClick()中传递。使用方法如下:
//点击链接蓝牙事件,根据XML获取的参数进行连接固定蓝牙。
 //点击链接蓝牙事件,根据XML获取的参数进行连接固定蓝牙。
btConnectClick(e){
    var name = e.currentTarget.dataset.name;
    var Id = e.currentTarget.dataset.id;
    //console.log('Click' + name + ' ' + Id);
btConnection(Id);//链接蓝牙
},
注意:显示控件的时间需要在page空间中定义
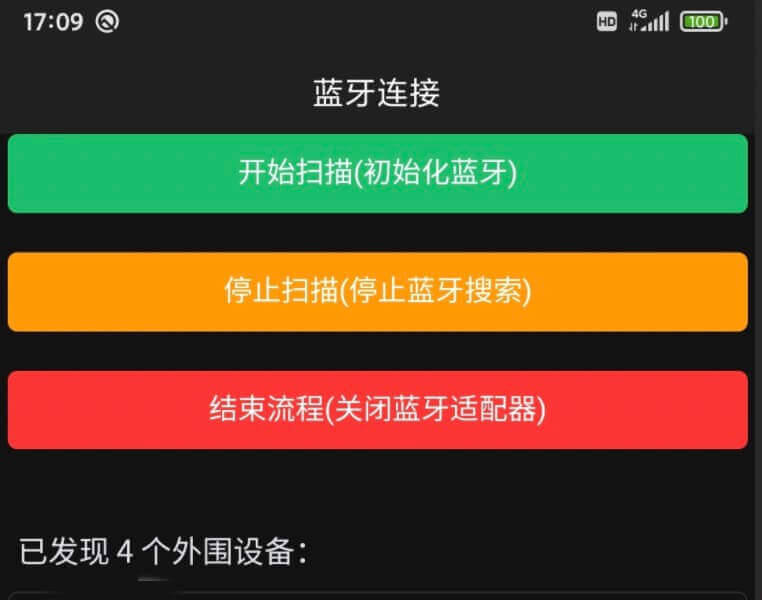
有了以上的基础,我们就可以进行蓝牙的相关操作了
1. 打开蓝牙支持库
在所有蓝牙操作调用前,要先调用这个wx.openBluetoothAdapter()当然调用之前最好Ian关闭一下,保证可以顺利的打开。
//打开蓝牙库,所有相关蓝牙的操作都要在此之后function openBtAdapter(){

  //先释放蓝牙的资源  wx.closeBluetoothAdapter({
    success (res) {
      console.log(res)
    }
  })
  //打开蓝牙Adapter  wx.openBluetoothAdapter({
    success: (res) =>{
      console.log(" init ble lib", res)
    },
    fail: (res) =>{
      console.log("初始化蓝牙失败", res)
    }
  })}
2.开启扫描蓝牙函数
开启蓝牙扫描函数后,所有被扫描到的蓝牙都会出发回调函数wx.onBluetoothDeviceFound,并将扫描到的蓝牙信息传递出来,我们可以在这个回调函数中处理扫描的蓝牙设备。
//开启蓝牙扫描,当扫描命令执行后,会在回调函数中返回扫描的蓝牙信息function startBluetoothDevicesDiscovery() {
  //console.log("执行连接蓝牙设备 回调空===" + _discoveryStarted);  if (_discoveryStarted) {
      return;
  }
  _discoveryStarted = true
  //开始扫描  wx.startBluetoothDevicesDiscovery({
      services: serviceUUID, //如果设置此参数,则只搜索广播包有对应 uuid 的主服务的蓝牙设备。这里可以做过滤,这里只能过滤主服务,设备有可能没有设置主服务,只扫描关心的蓝牙      allowDuplicatesKey: false, //不允许重复上报,但是感觉没起作用      success: (res) => {
          console.log('启动搜索蓝牙设备, 结果  :', res)
          //onBluetoothDeviceFound()   //先调用此方法再使startBluetoothDevicesDiscovery      },
      fail(res) {
          asddErrorCallback(res.errCode, "");
          console.log('startBluetoothDevicesDiscovery fail', res);
      }
  })}
3. 接下来看一下回调函数的处理
在回调函数中,我们根据蓝牙设备广播的名称以及厂商自定义字段来筛选出自己关心的蓝牙设备,并通过page中的函数将设备存储到数据列表中,这里就用到了上面提到的page中数据表的操作。
//蓝牙扫描函数的回调,这里会在回调page中的函数去向缓存中添加搜到的合法蓝牙设备wx.onBluetoothDeviceFound(function(res) {

  var devices = res.devices;
  //console.log('new device ');  //console.dir(devices);  //console.log(devices[0].name);  let DevName = devices[0].name;
  //判断,只有名字不为空的设备才进行添加和展示  if((DevName.substring(0,2) != "未知") && (DevName != "") && devices[0].RSSI > -80)
  {
    var manufacture = "Others"; //现实中需要显示是否是自己关注的品牌,根据厂商自定义字段来进行标识    //console.log("符合:" + DevName);    //console.dir(devices[0].advertisData);    //判断厂商自定义段    if(devices[0].advertisData != null){ //在厂商自定义数据不为空的情况下进行判断,为空直接定义为其他品牌      var hexstr = ab2hex(devices[0].advertisData);
      //console.log(hexstr);      var data = new Uint8Array(devices[0].advertisData);
      if(data[0] == 0x11 && data[1] == 0x12){ //ninebot的自定义        manufacture = 'Debug‘s';
      }
    }
    else{
      manufacture = 'Others';
    }
    //调用page空间的添加设备函数,用来讲关心的蓝牙设备信息添加到缓存列表中进行渲染显示。    _this.btAddDevice(devices[0].name,manufacture,devices[0].RSSI,devices[0].deviceId);
  }
  else
  {
    //console.log("不符合" + DevName.substring(0,3) + devices[0].RSSI);  }
  })
4. 关闭扫描
//停止搜寻附近的蓝牙外围设备。function stopBluetoothDevicesDiscovery() {
  wx.stopBluetoothDevicesDiscovery({
    success (res) {
      _discoveryStarted = false; //更新扫描状态值,表示停止了扫描      console.log(res + "成功")
    },
    fail(res){
      console.log(res)
    }
  })}
6.链接蓝牙
在链接蓝牙成功后,可以获取对应设备的服务列表
// 连接蓝牙设备,根据设备的ID进行连接,这个在点击连接时被调用function btConnection(Id) {
  wx.createBLEConnection({
      deviceId: Id,
      success: (res) => {
          wx.showToast({
              title: '设备连接成功',
              duration: 2000
          })
          deviceId = Id;//将连接的设备ID进行保存,用来表示当前连接的DeviceID          _this.btConnected(deviceId,true);
          btGetServices(Id)
      },
      fail: (res) => {
          console.log('createBLEConnection fail', res);
          //asddErrorCallback(res.errCode, "");      }
  })
  //连接后停止搜索  stopBluetoothDevicesDiscovery();}
7. 获取服务UUID
//连接设备后,根据设备ID进行服务获取function btGetServices(Id){

  wx.getBLEDeviceServices({
    deviceId: Id,
    success: function(res) {
      console.log(res.services);
      let i = 0;
      while(res.services[i]){
        serviceUUID[i]=res.services[i].uuid;
        console.log('UUID:' + serviceUUID[i]);
        i++;
      }
      //获取服务下面的所有个性,这里只获取第一个服务下面的特性,应该改为指定服务UUID下面的服务。      btGetCharacter(Id,serviceUUID[0]);
    }
  })}
8.获取CharacterUUID
//获取指定设备ID的制定服务下面的特性值function btGetCharacter(deviceId,serviceId){

  wx.getBLEDeviceCharacteristics({
    deviceId: deviceId,
    serviceId: serviceId,
    success: function (res) {
      let i = 0;
      while(res.characteristics[i]){
        characterUUID[i]=res.characteristics[i].uuid;
        console.log('characterID:' + characterUUID[i]);
        i++;
      }
      setTimeout(function () {
        //要延时执行的代码,打开notify,这里也应该打开制定特性。        btNotifyValueChange(deviceId,serviceId,characterUUID[0]);
      }, 1000)  //在这里打开notify进行接受
    }
  })}
9.根据写特性来进行写操作
//写入数据测试函数function btWrite(deviceId,serviceId,characterId){let buffer = new ArrayBuffer(3)let dataView = new DataView(buffer)dataView.setUint8(1, 100)console.log('send use UUID:' + characterId);wx.writeBLECharacteristicValue({
  deviceId: deviceId,
  serviceId: serviceId,
  characteristicId: characterId,
  value: buffer,
  success: function (res) {
    console.log('write success', res.errMsg)
  },
  fail: function (res) {
    console.log(res,"fail");
  },})}
10.读特性的notify
对于notify的操作是首先打开notify,之后会在相应的回调函数中接收到设备发送来的数据。
// 打开制定特性的notify进行数据接收,接收到的数据会在下面的回调函数中返回function btNotifyValueChange(deviceId,serviceId,characterId){
  //console.log(deviceId + '-' + serviceId + '-' + characterId);  wx.notifyBLECharacteristicValueChange({
    state: true,
    deviceId: deviceId,
    serviceId: serviceId,
    characteristicId: characterId,
    success: function (res) {
      console.log('notify success' + characterId);
    },
    fail: function (res) {
      console.log(res,"fail");
    },
  })}
notify的回调函数处理
//接收数据的回调函数,这里进行数据接收组合和解析wx.onBLECharacteristicValueChange(function(res) {

  console.log('characteristic value comed:', ab2hex(res.value))
})© 版权声明
文章版权归作者所有,未经允许请勿转载。
相关文章
没有相关内容!

暂无评论...